[Versión en español debajo]
Welcome to our weekly blog about the Klimaschutz Monday’s workshops for climate protection.
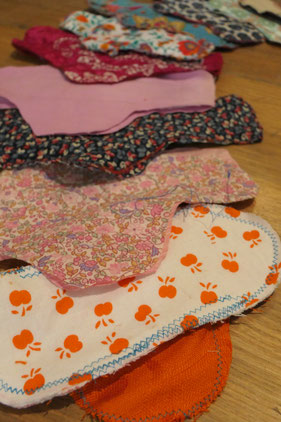
This week we did a workshop on how to make menstruation pads.
The waste generated through feminine hygiene products is very huge.
Throughout the life of a woman it’s estimated that around 12,000 tampons and / or compresses can be used. 6 compresses / tampons per day (depending on each woman) is calculated, for 5 days every 28 days, thirteen times a year from 14 to 45 years (approximately).
Conventional compresses are composed of 90% plastic and tampons use bleaches, perfumes, and other toxic chemicals that can be absorbed by the body and, after being used, they are going to our waters. In addition, by absorbing menstruation can cause irritation and dryness, especially the last days of the period. Tampons and compresses also absorb the vaginal discharge modifying the vaginal flora so that women are left unprotected against infections, candidiasis, etc.
To this sanitary part for the woman's body, it must be added that these products are for one single use. This type of products add an exaggerated amount of non-biodegradable waste that harms the environment. The estimated biodegradation time of these products is around 100 years. Apart from this, we must add that each product is wrapped in a secondary packaging that facilitates its transport and maintains the hygiene. In turn, these individual packages are contained in a larger container (cardboard box, plastic package...) that we have to count as future waste generated from the use of these hygiene products.
Plastic inside plastic inside plastic.
A third point of view, that we must take care of it, is the economic one because it is estimated that, buying tampons and compresses, a woman invests between 350 and 400 euros per year.
And after this introduction you will ask yourself:
How do I make my menstruation pad?
Well do not worry that here we come with DIY step by step.
STEP 1- Choose two fabrics to make the compress. They will be the top and bottom part (you can choose the same fabric if you want it to have the same on both sides)
STEP 2- With the template, mark the edge of the two fabrics. The size will depend on how big you want it.
STEP 3- For the stuffing you can use different components: towels, baby cloths ... any material that is absorbent and you can reuse your house. The size of the padding should be the size of the centre part of the template (without the wings).
STEP 4- Place one of the cover fabrics, then the absorbent fabrics that you have chosen and on top of the third fabric that would close. (On the filling, you can enter all the filling you need but if it is too big then it could be uncomfortable).
STEP 5- Carefully put pins that hold the two fabrics and the stuffing so when sewing does not move us in the original way that we want.
STEP 6- We sew the edges of the outer fabric in a zigzag pattern. Once you have this part stitched you go to sew the stuffing to fix it in the centre and do not move at the time of placing it.
STEP 7- Finally, we will sew two hooks in the ends of the wings to adjust it at the time of use and not to move.
And you would have your cloth compress!
[Español]
Bienvenidas y bienvenidos a nuestro blog semanal sobre los talleres del lunes del proyecto Klimaschutz para la protección del clima.
Esta semana hemos realizado un taller sobre como confeccionar compresas de tela para la menstruación.
Los residuos generados a través de los productos de higiene femenina son muy grandes.
A lo largo de la vida de una mujer se estima que pueden llegar a ser utilizados unos 12.000 tampones y/o compresas. Se calcula una media de 6 compresas/tampones al día (dependiendo de cada mujer), por 5 días cada 28 días, trece veces al año desde los 14 a los 45 años (aproximadamente).
Las compresas convencionales están compuestas en un 90% por plástico y los tampones utilizan blanqueantes, perfumes, lejías y otros productos químicos tóxicos que pueden ser absorbidos por el cuerpo y, después de ser usados acaban desechados en nuestras aguas. Además, por el hecho de absorber la menstruación puede generar irritaciones y sequedad, sobretodo los últimos días del periodo. Tampones y compresas absorben también el flujo vaginal modificando la flora vaginal por lo que las mujeres quedan desprotegidas ante infecciones, cándidas ,etc.
A esta parte sanitaria para el cuerpo de la mujer, hay que añadir que estos productos son de un solo uso. Este tipo de productos suman una cantidad exagerada de residuos no biodegradables que perjudican el medio ambiente. El tiempo estimado de biodegradación de estos productos rozan los 100 años. A parte de esto, debemos añadir que cada producto está envuelto en un envase secundario que nos facilita su transporte y mantiene su higiene. A su vez, estos envoltorios individuales están contenidos en un envase mayor (caja de cartón, paquete de plástico…) que deberemos de contabilizar como futuro residuo generado del uso de estos productos de higiene.
Plástico dentro de plástico dentro de plástico.
Un tercer punto de vista que debemos de tener en cuenta es el económico pues se calcula que, entre tampones y compresas, una mujer invierte entre 350 y 400 euros anuales.
Y después de esta introducción te preguntaras:
¿Y como hago yo mi compresa de tela?
Pues no te preocupes que aquí venimos con el DIY paso por paso.
PASO 1- Escoger dos telas para hacer la compresa. Serán la parte de arriba y la parte de abajo (puedes escoger la misma tela si quieres que sea igual por ambas caras)
PASO 2- Con la plantilla, marca el borde de las dos telas. El tamaño dependerá de lo grande que tu quieras que sea.
PASO 3- Para el relleno de la compresa puedes utilizar diferentes componentes: toallas, paños de bebes… cualquier material que sea absorbente y puedas reutilizar de tu casa. El tamaño del relleno debe ser del tamaño de la parte centro de la plantilla (sin las alas).
PASO 4- Colocamos una de las telas, después las telas absorbentes que hayas escogido y encima la tercera tela que cerraría. (Sobre el relleno, puedes introducir todo el relleno que necesites pero teniendo en cuenta que si es muy gordo luego será incómoda).
PASO 5- Con cuidado colocamos alfileres que sujeten las dos telas y el relleno para que a la hora de coser no se nos mueva de la forma original que nosotras queremos.
PASO 6- Cosemos los bordes de la tela exterior en forma de zigzag. Una vez que tienes esta parte cosida pasas a coser el relleno para fijarlo en el centro y no se mueva a la hora de colocarla.
PASO 7- Para finalizar, le coseremos dos corchetes a los extremos de las alas para poder ajustarla a la hora de usarla y que no se mueva.
Y ya tendrías tu compresa de tela!!