[Spanish version below]
Welcome to our blog of the workshops of the Klimaschutz project for climate protection. In this post we had an introduction to weaving but we didn’t use wool for it, we wove with T-shirts! With t-shirts? Yes, with t-shirts... Don’t you have some t-shirts at home that are too old and you don’t know what to do with them? You can always exchange with friends, use them as rags to clean, donate them... Or you can always create your yarns of fabric to be able to weave and make many other crafts.
For example, we have many T-shirts that arrive to our swapshop in a not very good condition, but we don’t want to throw them away. We created T-shirt yarn to do our workshops, such as the carpet weaving workshop.
This blog is divided into three important parts:
1º How to make a loom with cardboard.
2º How to make T-shirt yarn.
3º How to weave in our loom.
Let's go with the first part of this blog:
HOW TO MAKE A CARDBOARD WEAVING LOOM:
Of course, if you have enough cardboard you can make a loom as big as you want.
STEP 1: Leaving 2 cm clear on the edge, mark every 5 mm with a marker at the top and bottom. Make sure that the marks align on both sides.
STEP 2: Using a pair of scissors, make ~1cm cuts.
STEP 3: Use two smaller pieces of cardboard and glue them right next to the cuts. The two smaller pieces of cardboard will lift the warp thread, which makes it easier to weave.
STEP 4: Now, make a big knot on the end of your yarn and place it behind the first cut.
STEP 5: Wrap it around the opposite cut and keep going (make sure the tension is good)
STEP 6: Once you reach the end, cut the yarn, wrap it around the previous, cut and make a knot.
And now you have your weaving loom ready to make your carpet!
When we have our loom already, we should to go to the second important part to be able to weave our karpet:
HOW TO MSKE T-SHIRT YARN.
STEP 1: Lay your t-shirt out on a working surface. Cut a horizontal line directly under the sleeves. Cut off the hem in the bottom of the T-shirt.
STEP 2: Fold one side of the T-shirt towards to the other, leaving a 3cm space at the top. Cut into strips (2,5cm) BUUUUUUUT leaving the top part uncut.
STEP 3: Unfold the t-shirt so you can see the separate strips. Starting at the first strip, cut diagonally to the second strip. Repeat across.
STEP 4: Now that you have a single strip of t-shirt thread, stretch it with your hands so that it is thinner and in the shape of thread.
STEP 5: Roll the yarn into a ball.
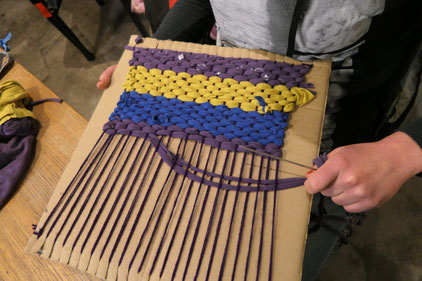
Now, you have your cardboard loom and your T-shirt yarn, you can start to weave!
HOW TO WEAVE:
STEP 1: Cut a length of yarn and thread the yarn through the needle. (You can make a knot to keep it in the needle)
STEP 2: Use the needle to guide the yarn through the loom in an under-over pattern. (Under the first string, over the second, and so on.) Once the needle has passed through all of the strings, pull the yarn and push it up on the loom.
STEP 3: Bring the needle and yarn back through the loom from the side you just exited using an over-under pattern again but in the opposite way, if your first line of yarn goes under you should begin this time over. Pull the yarn and push it up on the loom everytime you finish a line.
STEP 4: If you want to change the color, or the yarn is ending, take it to the edge and leave a piece off there. Take the new one you want to use and start with that from where the ending tail is and follow the over-under rule.
TIP! - Every few rows, it's a good idea to use your thumbs to push the yarn up the strings so that it looks nice and even.
YOU FILLED UP YOUR LOOM!! And now what’s with all the endings everywhere?
STEP 5: Thread the thread on the needle and pass it through the end down. Then, cut the excess thread part, And repeat this with all the endings. Try to pull the ends of yarn through weaving of the same color.
STEP 6: Release the loops on the top first and the bottom ones later. Hold the weaving on the top and pull up on the top loops. Pull the strings on the weaving to hide the bottom loops. That makes the top loops longer. No worries, when all the bottom loops are hidden you should cut the top ones in the middle and tie those off.
STEP 7: Now you will have two long strings. You can hide them as you did in step 5.
AND YOU DID IT!!!
Now you have your new carpet!!!
[SPANISH]
Bienvenidas a nuestro blog de los talleres del proyecto Klimaschutz para la protección del clima. En este post tenemos una introducción a tejer pero nosotras no hemos utilizado lana para ello, ¡hemos tejido con camisetas! ¿Con camisetas? Sí sí, con camisetas… ¿No tenéis unas camisetas por casa que ya están muy viejas y no sabes qué hacer con ellas? Siempre puedes intercambiar con amistades, usar como trapos para limpiar, donarlas… O siempre puedes crear tus ovillos de tela de camiseta para poder tejer y hacer otras muchas manualidades.
Nosotras, por ejemplo, tenemos muchas camisetas que llegan a nuestra swapshop que no llegan en un estado muy bueno y no queremos tirar a la basura. Entonces, creamos ovillos de tela para poder hacer nuestros talleres como por ejemplo, el taller de tejer una alfombra.
Este blog se divide en tres partes importantes:
1º Cómo confeccionar un telar con cartón.
2º Cómo convertir una camiseta en ovillo.
3º Cómo tejer en nuestro telar.
Vamos con la primera parte de este blog:
CÓMO CONFECCIONAR TU TELAR DE CARTÓN:
Para realizar el telar donde vamos a confeccionar la alfombra necesitamos un cartón (tan grande como queramos el telar) las tijeras y un rotulador para realizar las marcas.
PASO 1: Dejando 2 cm libres en los laterales, haz una marca cada 5 mm en las partes superior e inferior haciendo que estas coincidan en ambos lados.
PASO 2: Con las tijeras, haz un corte en cada marca de 1 cm de longitud.
PASO 3: Después, pega dos trozos de cartón largo en el la parte de arriba y la de abajo al lado de los cortes que hemos realizado. Esto hará que el hilo esté en el aire y facilitará el tejido.
PASO 4: Ahora, haz un nudo grande al final de tu hilo y colócalo detrás del primer corte.
PASO 5: Coloca el hilo alrededor del corte opuesto y continua hasta llegar al ultimo (asegurate que la tensión es buena).
PASO 6 Cuando llega al final, corta el hilo, colócalo alrededor del corte anterior, haz un nudo y corta el hilo.
¡Ya tienes tu telar preparado para hacer tu alfombra!
Una vez que tenemos nuestro telar, debemos pasar al siguiente elemento importante para poder tejer nuestra alfombra:
CÓMO CONVERTIR UNA CAMISETA EN UN OVILLO:
PASO 1: Coloca la camiseta sobre una mesa. Corta una línea horizontal justo debajo de las mangas. También corta el dobladillo en la parte inferior de la camiseta.
PASO 2: Dobla un lado de la camiseta hacia el otro, dejando un espacio de 3 cm en la parte superior. Córtala en tiras (2,5cm) PEEEEEERO dejando la parte superior de la camiseta sin cortar.
PASO 3: Despliega la camiseta para ver las tiras separadas. Comenzando en la primera tira, corta diagonalmente a la segunda tira. Y así hasta el final.
PASO 4: Ahora que tienes una sola tira de hilo de camiseta, estirala con tus manos para que quede más fino y en forma de hijo.
PASO 5: Enrolla el hilo de la camiseta en una bola para conseguir el ovillo.
Pues ahora que ya tienes tu primer ovillo y tu telar de carton ya puedes empezar:
CÓMO TEJER EN NUESTRO TELAR:
PASO 1: corta un trozo de hilo y pasa el hilo por la aguja. (Puedes hacer un nudo para que no se salga de ella)
PASO 2: Usa la aguja como guía del hilo a través del telar siguiendo el patrón debajo-sobre. (Debajo de la primera cuerda, sobre la segunda, etc.) Una vez que la aguja haya atravesado todas las cuerdas, tira del hilo y empújalo hacia arriba en el telar.
PASO 3: Lleva de nuevo la aguja y el hilo a través del telar desde el lado por el que acaba de salir siguiendo el patrón debajo-sobre, pero de la manera opuesta. Si la primera línea de hilo pasa por debajo, entonces debes empezar por arriba. Tira del hilo y empújalo hacia arriba en el telar cada vez que termines una línea.
PASO 4: Si desea cambiar el color o el hilo se está terminando, llévalo al final y deja un pedazo allí. Coge el nuevo que quieres usar y comienza con él desde donde está el final del anterior y siga la regla de sobre-bajo.
¡¡CONSEJO!! - Cada pocas filas, es una buena idea empujar el hilo hacia arriba en las cuerdas para que se vea bonito y uniforme.
¡HAS TERMINADO! ¿Y ahora qué hacer con todos los finales?
PASO 5: Enhebra el hilo en la aguja y pásalo por el extremo hacia abajo. Luego, cortamos el exceso de hilo. Y repetimos esto con todos los finales. Trata de pasar los extremos del hilo a través del tejido del mismo color.
PASO 6: Suelta los bucles en la parte superior primero y luego en la parte inferior. Sostén el tejido en la parte superior y tira de los bucles superiores. Tira de las cuerdas en el tejido para ocultar los bucles inferiores. Eso hace que los bucles superiores se hagan más largos. No te preocupes cuando todos los bucles inferiores estén ocultos, debes cortar los superiores en el medio y atarlos.
PASO 7: Ahora tendrás dos cuerdas largas. Bueno, deberías ocultarlo como hicimos en el paso 5.
Y lo hiciste !!!
Ahora tienes tu nueva alfombra !!!