[English version below]
Herzlich Willkommen liebe Leute zu unserem nächsten Blogpost aus unserem neuen Klimaschutzprojekt “Mach mal”.
Am Montag haben wir uns mit 14(!) Leuten getroffen, um Meditationskissen aus ugecycelten Materialien herzustellen.
Nach einer kurzen EInführung in “Wer und was ist eigentlich Trial &Error?” und das Projekt als solches haben wir angefangen zu arbeiten. Wir listen jetzt hier die Schritte auf, die ihr gehen müsst, um Euch selbst ein Meditationskissen zu erschaffen. Also:
WAS BRAUCHST DU?
Alten Stoff (oder Klamotten) für den Bezug, Kreide, um den Stoff zu markieren, Nadeln und Pins, Faden und Nähmaschine (Du kannst es aber auch mit der Hand nähen, klar) sowe Füllstoff: Wolle, Baumwolle, eine altes Kissen, Getreide etc.
WIE GEHT DAS?
Du brauchst 2 Schablonen um den kreisrunden Stoff auszuschneiden. Du kannst das auch direkt auf dem Stoff machen, aber lieber vorher auf Papier, das kommt auf Dich an. Du kannst nen Teller oder eine Schüssel nehmen für die Schablone. So groß wie das ist, so groß wird später das Meditationskissen sein. Wir finden die Größe eines Pizzatellers ganz gut. Du brauchst 2 identische kreisrunde Stoffstücke. Dann machst Du noch eine Schablone für eine gerade Stoffbahn, die solange ist, wie der Umfang Deines Kreises. Alles klar? Die Breite der Stoffbahn kannst Du selbst bestimmen. Das Meditationskissen wird so hoch sein, wie Deine Stoffbahn breit.
UND DANN!
1.- Stoff aussuchen, Schablone drauf, mit Kreide markieren und ausschneiden. Pass auf dass die Kreise dieselbe Größe haben
2.- Die gerade Stoffbahn auf der schmalen Seite zusammen nähen
3.- Achte darauf, welche Seite des Stoffes Du außen haben willst. Immer auf Links nähen.
4.- Dann mit den Pins den runden Stoff an dem gerade genähten Teil festmachen (auch hier: Inside out!)
5.- Zusammen nähen :)
6.- Dann den zweiten Kreis unten als Boden für das Meditationskissen befestigen
7.- Dann nähen, aber ACHTUNG: Lass noch einen Teil offen, damit Du die Füllung reinstopfen kannst.
8.- Jetzt kansnt Du Dein Meditationskissen schon füllen mit allem was Dir einfällt: Alte T-Shirts, Wolle, Kissen, etc.
9.- Zum Schluss: Den Rest mit der Hand zunähen
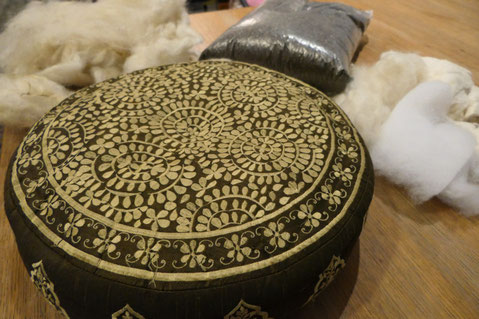
Und tata! Dein eigenes klimaneutral produziertes Meditationskissen. Viel Spass beim meditieren!
[ENGLISH]
Welcome everyone on second week of Klimaschutz workshops in Kulturlabor Trial&Error.
This week, we meet 14 people to make meditation cushions with recycled material.
After a little introduction about our collective and our project we started to work in and, we have here the steps for DIY if you are interested in.
WHAT DO YOU NEED?
· Textile enough for the cover.
· Chalk to paint the textile.
· Needles & pins.
· Thread.
· Sewing machine (it’s not needed. You can do it by hand but it takes more time.
· Stuff to fill the cushion: Wool, cotton… You can reuse a old cushion or pillow you had at home.
HOW TO DO IT?
Step 0: You need two stencils to paint and cut the textile later. You can do it straight in the textile but it’s better if you try first in a paper, it’s up to you.
With a plane plate you have at home (as much big is the plate, much big it will be the meditation cushion) you make two identical circle parts. After that, you should to do a rectangle as longer as the diameter of the plate in the long side and in the small side as you want. You must to know that as longer is the small side, the cushion will be higher.
Step 1: You should to find textiles that you like it to make the cover for this three parts you need. Two circles for the top and the bottom and one rectangle to the lateral of your cushion.
Step 2: When you have chosen the textiles, you should to draw the three pieces with the stencil help and a chalk. Be sure that the circles are the same size. You can do the second one from the first circle you did after you cut it.
Step 3: To cut the pieces.
Step 4: You should to sew the small sides of the rectangular piece. After that, you will have a circle form. (Take care about which part of the textile do you want to keep out of the cushion and sew it inside out)
Step 5: With the pins, fasten you one of the circular pieces to one of the long sides of the rectangle. (Don’t forget: inside out)
Step 6: Sew this part. Be careful with the pins and the machine if you’re doing by it.
Step 7: Fasten the second circular piece as the first one in the opposite side of the rectangle as the bottom of your cushion.
Step 8: You should to sew it but ATTENTION! You must to leave a little part without sewed. This hole it helps you to turn over the textile and to leave inside the seam and to fill the cushion after.
Step 9: Now you can fill it with wool, cotton, natural stuff you have at home, older pillows, upcycled t-shirts…
Step 10: When you have already filled, you should to finish sewing it by hand the last little part and…
YOU HAVE YOU HANDMADE UPCYCLED MEDITATION CUSHION!!
CONGRATS!!
We hope do you enjoy with the process and please, if you do it after, send some pictures to us by facebook or instagram!